Thursday, October 22, 2020

Connect to Azure Analysis Services using ADOMD client in .NET Application

Azure Analysis Services is a fully managed platform as a service (PaaS) that provides enterprise-grade data models in the cloud. Interacting with Azure Analysis Services directly using SDKs and APIs from your custom applications means you can expose your data directly to your audience, wherever they are. This posts will walk you through how to open a connection from C# code.

Create Azure Analysis Service resource

Follow this quick starter to create the server. You can also create a model with sample data (adventure works) right from within your Analysis Server. Click 'Manage' in the blade and click 'New Model'. Select 'Sample data' from the drop down and press 'Add'. It should add the model for you.

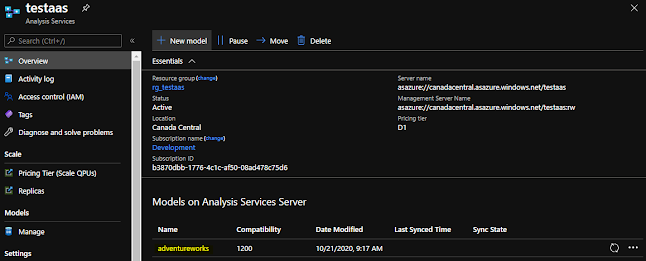
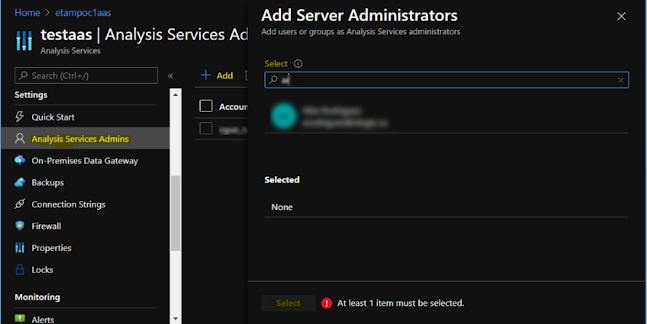
Also assign your account as Service Admin in order to connect from SSMS.

And copy the connection string directly from Azure Portal so we will use it later:

Register an application with the Microsoft identity platform

Azure Analysis Services uses Azure Active Directory (Azure AD) for identity management and user authentication. Service principals are used to perform automate common tasks, in our case, a c# application to query data from Azure Analysis Services. Follow this guide to register an application with Azure AD. 

When registration completes, the Azure portal displays the app registration's Overview pane, which includes its client ID and tenant ID.

Create a new application secret

You can add both certificates and client secrets (a string) as credentials to your confidential client app registration. Follow this guide to add a client secret to your registered application. After saving the client secret, the value of the client secret is displayed. Copy this value because you won't be able to retrieve the key later.

Grant permissions to app principal on the model

First, connect to Analysis Service using SSMS V17.1 and higher.

Then, select the database model and right click on Roles and add a new Role with read permission.

Now you can add the service principal you created in "Membership" tab.

Enter your principal in the "Manual Entry" box in the following format:

Acquire service principal token

This article show you how to connecting to Azure Analysis Services using service principal. The code below is to acquire a service principal token.

        private async Task<string> GetTokenAsync()

        {

            var authContext = new Microsoft.IdentityModel.Clients.ActiveDirectory.AuthenticationContext("https://login.windows.net/" + tenantId);

            var credential = new ClientCredential(clientId, clientSecret);

            var token = await authContext.AcquireTokenAsync($"https://{aasRegion}.asazure.windows.net", credential);

            return token.AccessToken; //Use this token to connect to AAS.

        }

Connecting to Azure Analysis Service using service principal token

Microsoft announced the .NET Core support for Azure Analysis Services client libraries in preview (AMO and ADOMD.NET). These packages are still in preview though, below I will use .Net as example.

Once we have the token, we can pass the token in password field in the connection string and leave user id empty.

        private string GetConnectionString(string token)

        {

            return $"Provider=MSOLAP;Data Source=asazure://{aasRegion}.asazure.windows.net/{aasServerName}:rw;Initial Catalog={aasDatabaseName};User ID=;Password={token};Persist Security Info=True;Impersonation Level=Impersonate";

        }

Where region is the Azure region in which the Azure Analysis Services instances has been deployed, and servername is the name you used to create the instance. Initial Catalog is be the name of your model. 

The full source code can be downloaded from my Github repository.


Tuesday, November 10, 2015

Generate Sprites with Sprity

CSS Sprites combins multiple images into a single image file for use on a website, to help with performance.

If you're using Grunt, Gulp, or Node in general, Sprity is a wonderful node package that creates sprites from a glob of images. Sprity has a lot of great features including formatting output as PNG, JPG (or Data URIs of those), and stylesheet generation in CSS, LESS, Sass, and Stylus.

node.js
Install node.js first if your system don't have one.

sprity
To compile sprites via command line, install sprity globally with:
> npm install sprity -g

sprity command line
Then install command line interface for sprity
> npm install sprity-cli -g

creat command
Usage:
sprity create <out> <src>... [options]

sprity create . C:\Projects\images\*.* -s C:\Projects\css\sprite.css
This will combine all images under C:\Projects\images, and create image sprite to current folder and also write css to sprite.css.

Options

out     path of directory to write sprite file to
src     glob strings to find source images to put into the sprite

Options:
    -b, --base64           create css with base64 encoded sprite (css file will be written to )
    -c, --css-image-path   http path to images on the web server (relative to css path or absolute path)  [../images]
    -f, --format           output format of the sprite (png or jpg)  [png]
    -n, --name             name of sprite file without file extension   [sprite]
    -p, --processor        output format of the css. one of css, less, sass, scss or stylus  [css]
    -t, --template         output template file, overrides processor option
    -r, --retina           generate both retina and standard sprites. src images have to be in retina resolution
    -s, --style            file to write css to, if omitted no css is written
    -w, --watch            continuously create sprite
    --background           background color of the sprite in hex  [#FFFFFF]
    --cachebuster          appends a "cache buster" to the background image in the form "?<...>" (random)  [false]
    --margin               margin in px between tiles  [4]
    --interpolation        Interpolation algorithm used when scaling retina images (nearest-neighbor|moving-average|linear|grid|cubic|lanczos)
    --opacity              background opacity of the sprite. defaults to 0 when png or 100 when jpg  [0]
    --orientation          orientation of the sprite image (vertical|horizontal|binary-tree)  [vertical]
    --prefix               prefix for the class name used in css (without .)
    --no-sort              disable sorting of layout


Note
sprity use file name as css class name, so better change all image files to lowercase. Below is a script to do this:
 for /f "tokens=*" %%a in ('dir C:\Projects\images /b/s/l') do (
    set f=%%a
    set f=!f:%%~dpa=!
    ren "%%a" "!f!"
)


If you are looking for online tool, try this url:
http://zerosprites.com/

Tuesday, June 03, 2014

Using JSON Web Tokens authentication in Angular Web API request


Introduction


There are basically two different ways of implementing server side authentication for apps with a frontend and an API:
  • The most adopted one, is Cookie-Based Authentication (you can find an example here) that uses server side cookies to authenticate the user on every request.
  • A newer approach, Token-Based Authentication, relies on a signed token that is sent to the server on each request.
In this post we will implement API authentication based on standard JSON Web Token (JWT).


ASP.Net Web API


There is an open project JwtAuthForWebAPI implement a DelegatingHandler that creates a new ClaimsPrincipal based on the incoming token and assigns it to the current thread.

1. You can install the NuGet package for this library at https://www.nuget.org/packages/JwtAuthForWebAPI/.

2. Register the handler in your WebApiConfig.Register() method:


var tokenBuilder = new SecurityTokenBuilder();
var configReader = new ConfigurationReader();

var jwtHandlerSharedKey = new JwtAuthenticationMessageHandler
{
    AllowedAudience = configReader.AllowedAudience,
    Issuer = configReader.Issuer,
    SigningToken = tokenBuilder.CreateFromKey(configReader.SymmetricKey),
    PrincipalTransformer = new SimplePrincipalTransformer()
};

config.MessageHandlers.Add(jwtHandlerSharedKey);

3. Secure your controllers and/or their actions with the [Authorize] attribute - per standard ASP.NET authorization practices.

[Authorize]
public string Get(string id)
{
...
}

4. Assign a token when user login with correct password.

var configReader = new ConfigurationReader();

var key = Convert.FromBase64String(configReader.SymmetricKey);
var credentials = new SigningCredentials(
    new InMemorySymmetricSecurityKey(key),
    "http://www.w3.org/2001/04/xmldsig-more#hmac-sha256",
    "http://www.w3.org/2001/04/xmlenc#sha256");

var tokenDescriptor = new SecurityTokenDescriptor
{
    Subject = new ClaimsIdentity(new[]
    {
        new Claim(ClaimTypes.Name, "bsmith"), 
        new Claim(ClaimTypes.GivenName, "Bob"),
        new Claim(ClaimTypes.Surname, "Smith"),
        new Claim(ClaimTypes.Role, "Customer Service")
    }),
    TokenIssuerName = "corp",
    AppliesToAddress = configReader.AllowedAudience,
    SigningCredentials = credentials
};

var tokenHandler = new JwtSecurityTokenHandler();
var token = tokenHandler.CreateToken(tokenDescriptor);
var tokenString = tokenHandler.WriteToken(token);

return tokenString;

Angular Client Side


1. The first step on the client side using AngularJS is to retrieve the JWT Token and have the JWT saved on sessionStorage.

myApp.controller('UserCtrl', function ($scope, $http, $window) {
  $scope.user = {username: 'john.doe', password: 'foobar'};
  $scope.message = '';
  $scope.submit = function () {
    $http
      .post('/authenticate', $scope.user)
      .success(function (data, status, headers, config) {
        $window.sessionStorage.token = data.token;
        $scope.message = 'Welcome';
      })
      .error(function (data, status, headers, config) {
        // Erase the token if the user fails to log in
        delete $window.sessionStorage.token;

        // Handle login errors here
        $scope.message = 'Error: Invalid user or password';
      });
  };
});


2. Add Authorization header for every outgoing request:


myApp.factory('authInterceptor', function ($rootScope, $q, $window) {
  return {
    request: function (config) {
      config.headers = config.headers || {};
      if ($window.sessionStorage.token) {
        config.headers.Authorization = 'Bearer ' + $window.sessionStorage.token;
      }
      return config;
    },
    response: function (response) {
      if (response.status === 401) {
        // handle the case where the user is not authenticated
      }
      return response || $q.when(response);
    }
  };
});

myApp.config(function ($httpProvider) {
  $httpProvider.interceptors.push('authInterceptor');
});

Reference:
1.  Cookies vs Tokens. Getting auth right with Angular.JS
2. Techniques for authentication in AngularJS applications
3. JwtAuthForWebAPI

Friday, May 16, 2014

AngularJS

1. AngularJS
AngularJS is an open-source web application framework, maintained by Google and community, that assists with creating single-page applications, one-page web applications that only require HTML, CSS, and JavaScript on the client side.

A very good introduction video by Dan Wahlin:
AngularJS Fundamentals in 60 Minutes - Modules, Routes and Factories

The AngularJS Magazine

Miško Hevery discusses the advantages and disadvantages of various design choices when structuring an app in AngularJS, and some of the best practices in the development.
AngularJS MTV Meetup: Best Practices (2012/12/11) 

2. Yeoman
Miško Hevery suggest Yeoman generator for AngularJS. It will make Angular development much easy with Yeoman & generator-angular.

Several open source tools need:
a. Install Node.js
b. Install Ruby, also make sure that path to Ruby bin folder is added to %PATH%
c. Install Git
d. Install compass, bower, and generator-angular

npm install -g bower
npm install -g generator-angular
 
restarted cmd window and ran "bower install" in the app folder After that


e. Once we have Node, we’ll install generator-angular which will also automatically install Yeoman, Grunt, and Bower.
 
Now create a project folder, and change current folder to project folder
mkdir myApp cd myApp
bower install
npm install generator-angular    # Local install to myApp
yo angular:app myApp 
 
More generators
 
f. Grunt work


grunt server

3. Bootstrap
Code a Responsive Website with Bootstrap 3 - [Lecture 1]

Thursday, March 20, 2014

Bridge Mode Workaround for Rogers Router CGN2-ROG

  1. Log into your CGN2-ROG, normally located at 192.168.0.1
  2. Credentials are cusadmin/password by default, because it’s a magical star child who wants to be different.
  3. If you can’t log in, factory reset it, or use the usb unlocker they may or may not have been included with the device.
  4. Go to 192.168.0.1/user/setup-capability.asp
  5. Disable everything, hit apply. This will place the router into bridge mode. You will NOT be able to access the router now. If you need to, I’d recommend factory reset. It’s possible to directly connect a machine to the router, and access the router through it’s external IP, but just…don’t do that.
  6. Set up your second router, plug the ethernet cable into the LAN port 1 of the CGN2-ROG, and into the WAN port of the new router. Turn it on.
  7. You should be good to go, and can treat your new router as the main router. For all intents and purposes, the CGN2-ROG is now just a fancy internet box.

Monday, February 10, 2014

Custom JQuery Validation Method and Message

Validate forms like you've never validated before! See full documentation here.

List of built-in Validation methods


A set of standard validation methods is provided:

    required – Makes the element required.
    remote – Requests a resource to check the element for validity.
    minlength – Makes the element require a given minimum length.
    maxlength – Makes the element require a given maxmimum length.
    rangelength – Makes the element require a given value range.
    min – Makes the element require a given minimum.
    max – Makes the element require a given maximum.
    range – Makes the element require a given value range.
    email – Makes the element require a valid email
    url – Makes the element require a valid url
    date – Makes the element require a date.
    dateISO – Makes the element require an ISO date.
    number – Makes the element require a decimal number.
    digits – Makes the element require digits only.
    creditcard – Makes the element require a credit card number.
    equalTo – Requires the element to be the same as another one

For example:

<input id="yourEmail" name="yourEmail" class="required email" />
<input id="confirmEmail" name="confirmEmail" equalTo="#yourEmail" />

Now let's implement our custom validation method "naPostal" to validate Canada/US postal code:

<script type="text/javascript">

        jQuery.validator.addMethod("naPostal", function (postal, element) {
            if (this.optional(element)) return true;
            var ctyField = $(element).attr("countryField");
            if (ctyField && $(ctyField).val() == "CA") return postal.match(/[a-zA-Z][0-9][a-zA-Z](-| |)[0-9][a-zA-Z][0-9]/);
            if (ctyField && $(ctyField).val() == "US") return postal.match(/^\d{5}(?:[\s-]\d{4})?$/);
            return postal.match(/^\d{5}-\d{4}$|^\d{5}$|^[a-zA-Z][0-9][a-zA-Z](| )?[0-9][a-zA-Z][0-9]$/gm);
        }, "Invalid postalcode");

        jQuery.extend(jQuery.validator.messages, {
            //Custom error message
            required: "Required field",
            email: "Please enter a valid email address."
        });

</script>

So we can use this method in our HTML code:

<input id="postalCode" name="postalCode" class="required naPostal" countryField="#countryCode" />
<select id="countryCode" name="countryCode">
    <option value="CA">Canada</option>
    <option value="US">USA</option>
</select>

Wednesday, November 20, 2013

Memcached in MVC projects

1. Install Memcached server in Windows

The latest Memcached version is 1.4.5, but the application doesn't support "-d install" parameter to install itself as Windows service.

So right now the 1.4.4 is still the option to go under Windows. Get a package from memcached 1.4.4 for Windows 32-bit from http://downloads.northscale.com/memcached-win32-1.4.4-14.zip.

Unzipped to a folder, then run the following command to install as win services
memcached.exe -d install

Start the server from the Microsoft Management Console or by running one of the following commands:
memcached.exe -d start

2. Check Memcached installation

You can telnet to the default port 11211 to check the status:
telnel localhost 11211

Then use the command stats to check status
stats
flush_all

3. Enyim Memcached client

EnyimMemcached is a .NET client library for memcached written in C#. You can get the source code from https://github.com/enyim/EnyimMemcached

Then it's simple to use the cache:

private static IMemcachedClient _cache = new MemcachedClient();

_cache.Store(StoreMode.Set, key, value);

object r = _cache.Get(key);
Of course you need some setting in the app/web.config:


You don't need log section if you are not doing the detail logging. Also the transcoder section is added here because I'm using the DataContractSerializer for my entities.

4. Some notes

On Azure, window only support the default protocol (Text).
 
The Enyim source code getting from Github is using log4net 1.2.10.0 targeting at .Net framework 3.5. If you are using log4net 1.2.12.0 (targeting at .Net framework 4.0) then there are some dll binding issue.

In order to re-compile the project to reference log4net 1.2.12.0 and targeting .Net framework 4.0, I end up disable the sign and removing the strong name sign public key file public_key.snk from the project, also remove the reference part in the CommonProperties.targets file under build folder.